Monday, November 26, 2018

How to Enable or Disable Apps on Your iPhone Lock Screen 2019


How to Enable or Disable Apps on Your iPhone Lock Screen 2019

Enabling or Disabling the Apps

This feature resides in your Settings app, so pop it open and then follow these steps to get to the apps.
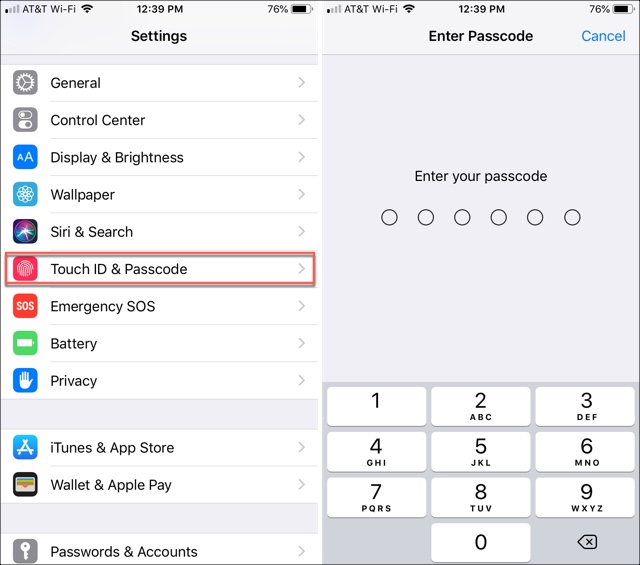


Scroll down to and tap Touch ID & Passcode.


Enter your passcode to access the settings.


Move to the near bottom of the screen to the section called Allow Access When Locked


Now, simply move the sliders to green for the apps you want and do the opposite for those you don’t.


The list of available apps includes:


Today View


Notification Center


Control Center


Siri


Reply with Message


Home Control


Wallet


Return Missed Calls


USB Accessories

When you finish, you can go back to your main Settings with the arrow at the top or just close the Settings app.
Conclusion

This very simple setting is one that you can use just for those apps you tend to need quickly. You don’t have to worry about unlocking your phone first to navigate where you want to go.

Sponsor ads:

Gihosoft Free iPhone Data Recovery:https://www.gihosoft.com/iphone-data-recovery-free.html

Gihosoft iPhone Data Recovery Free

Free iPhone Data Recovery Software for Windows/Mac

Recover up to 12+ types of files, including contacts, SMS, photos, WhatsApp, Viber, notes, etc.

Restore lost data from iOS devices directly or from iTunes and iCloud backup

Recover iPhone data lost due to iOS upgrade/jailbreak, accidental deletion, device lost or broken

Support all the latest iPhone, iPad and iPod Touch

Both Free and Pro version.

If you lost data after you updated to a new iPhone, you can always use Gihosoft iPhone Data Recovery to get the data back from the old iPhone or backup.You may also like: iphonerecovery.com

If you use android phones, please choose Gihosoft Android Data Recovery.

With Gihosoft Android Data Recovery, no longer afraid of data loss!

Worth reading:Best youtube downloader online download youtube 1080p

Friday, November 23, 2018

How to Fix Instagram Notifications Not Working on iOS 12

How to Fix Instagram Notifications Not Working on iOS 12


However, many people reported that they did not get any Instagram notifications on their iPhone. This issue usually occurs after iOS system update. Well, today we list 5 quick methods to fix Instagram notifications not working on iOS 12. In addition, these solutions also work for other versions of iOS on your iPhone or iPad.
Method 1: Simply Restart Your iOS Device


Restarting your iPhone or iPad is the simplest way to fix Instagram notifications not working on iOS 12. Just press and hold the power button until you see a message saying “Slide to Power Off”. Slide the slider from left to right to turn off your device and wait for a minute. Then press and hold the power button and release it once you see the Apple logo on your screen. If you can’t get Instagram notifications after restarting, move to the next method.
Method 2: Turn on Instagram Notifications


The common reason why Instagram notifications not working on your iOS devices is probably you turned Instagram Notifications off in Settings app. Now follow the guide to turn it on.


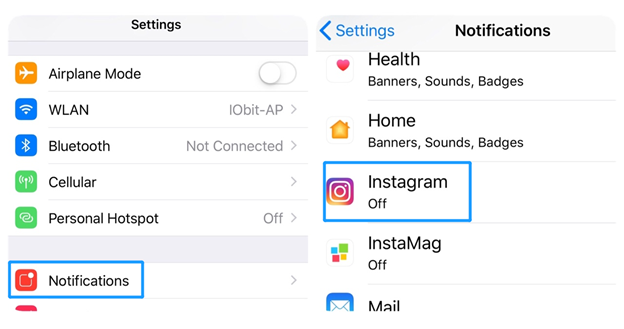
Step 1. Open Settings on your iPhone and go to “Notification” > “Instagram”.


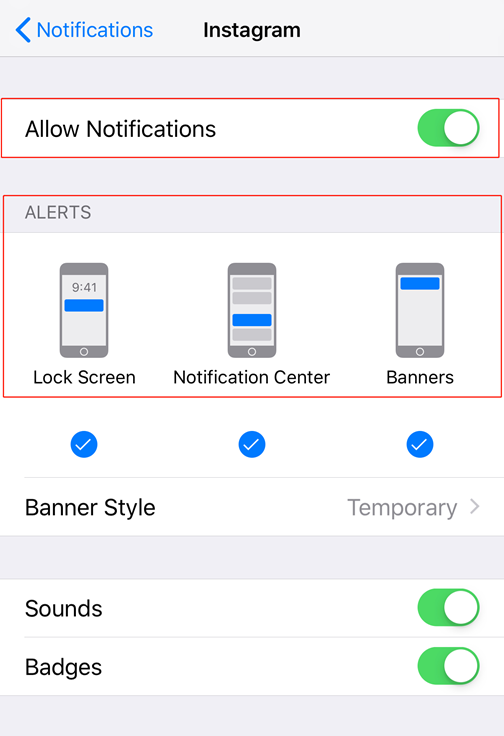
Step 2. Enable “Allow Notification” and then you can choose “Lock Screen”, “Notification Center” or “Banners” in “ALERTS” to show your notifications.


Step 3. Switch on “Sounds” so that you can identify the messages from Instagram.
Method 3. Reset Network Settings


If you still can’t fix Instagram notifications not working on iOS 12 after carrying out the above two methods, then you may need to check out the network settings. To solve this problem, you must ensure that there is a proper internet connection established on your device. This method also works with other issues, like No Service on iPhone XS After iOS 12 Update, iPhone Email Loads Slowly in iOS 12, etc.


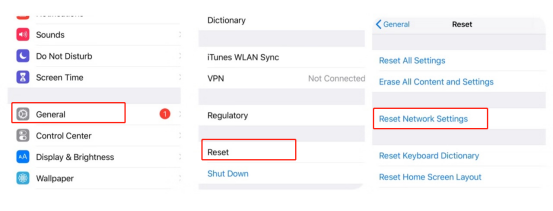
Just simply go to “Settings” > “General” > “Reset” > “Reset Network Settings”. This will delete all network settings including Wi-Fi networks, passwords, cellular settings, etc. returning them to factory defaults.


Method 4. Disable Do Not Disturb


After updating to iOS 12, you might turn on iPhone Do Not Disturb mode to avoid being distracting by the notifications. Then you will not get Instagram notifications. Now go to “Settings” > “Do Not Disturb” and then turn it off.


Method 5. Reinstall Instagram App


If you can’t fix Instagram notifications not working on iOS 12, try to reinstall Instagram to solve this issue. After the installation, you will see the popup messages which ask you to allow notifications for Instagram. Then click “Allow” button to see if it works.


Sponsor ads:


Gihosoft Free iPhone Data Recovery:https://www.gihosoft.com/iphone-data-recovery-free.html


Gihosoft iPhone Data Recovery Free


Free iPhone Data Recovery Software for Windows/Mac


Recover up to 12+ types of files, including contacts, SMS, photos, WhatsApp, Viber, notes, etc.


Restore lost data from iOS devices directly or from iTunes and iCloud backup


Recover iPhone data lost due to iOS upgrade/jailbreak, accidental deletion, device lost or broken


Support all the latest iPhone, iPad and iPod Touch


Both Free and Pro version.


If you lost data after you updated to a new iPhone, you can always use Gihosoft iPhone Data Recovery to get the data back from the old iPhone or backup.You may also like: iphonerecovery.com

If you use android phones, please choose Gihosoft Android Data Recovery.

With Gihosoft Android Data Recovery, no longer afraid of data loss!


Monday, June 11, 2018

Why I Can’t Delete Songs from iTunes

Why I Can’t Delete Songs from iTunes


Are you still wondering why iTunes won’t let you organize or delete your iPhone songs? Here are some of the reasons why you’re encountering this error:
iTunes may be automatically syncing your songs thereby not allowing you to erase your songs.
iTunes errors stemming from corrupt iTunes library or components may be the reason for iTunes not allowing you to erase content on your iPhone.
The songs you may be trying to delete via iTunes may have been purchased directly from iPhone. You can’t delete such songs using iTunes.


These are the major reasons why iTunes may be denying you the right to erase songs and other media files from iPhone.You may also like:
If you lost videos from iOS Camerall Roll which are nowhere to download again, you can use Jihosoft iPhone Data Recovery to get back deleted videos from iOS device including iPhone, iPad and iPod Touch.Please check jihosoft iphone data recovery

HOW TO UNLOCK THE IOS 12 WEATHER LOCK SCREEN WIDGET


HOW TO UNLOCK THE IOS 12 WEATHER LOCK SCREEN WIDGET
1. ENABLE LOCATION SERVICES FOR WEATHER


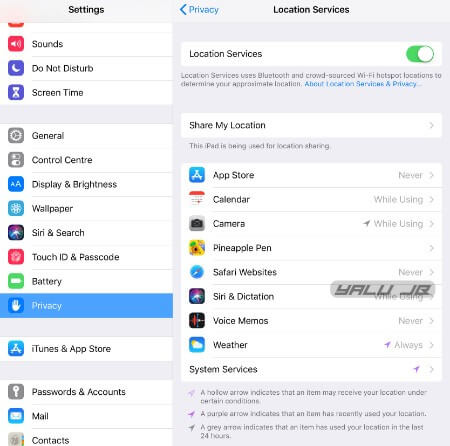
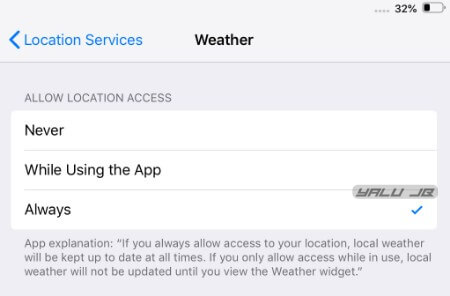
Step 1 Open the stock Settings app and go to Privacy > Location Services >Weather.


Step 2 Select Always. This will ensure the stock Weather service always has access to your location.


If you revoke or disable location access for this system service, the widget will not work because in that case, it won’t be able to display the weather conditions of your current location.
2. ENABLE BEDTIME MODE


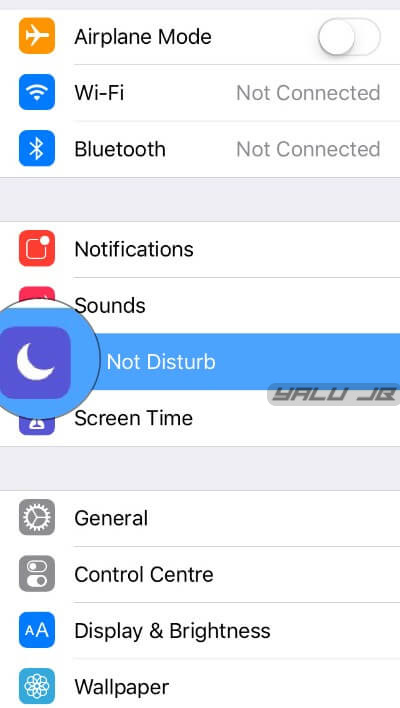
Step 3 Navigate to the Do Not Disturb section in Settings and toggle on DND mode.


Step 4 Schedule the “From” and “To” time according to your sleep time.


Step 5 Toggle on Bedside Mode.


You can check out our full guide on how to enable the Bedtime Do Not Disturb mode in iOS 12.
3. DISABLE BEDTIME MODE


This might seem a bit weird but you must disable the DND mode after enabling it.


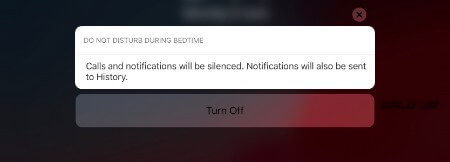
Step 6 Come back to your lock screen and long press or 3D Touch the DND notification present therein.


Step 7 Select Turn Off to disable Do Not Disturb Mode.


Alternatively, you can get your device to display this widget once the scheduled DND cycle ends.
WRAPPING UP


That’s all there’s to it! Your iPhone will now greet you with a “Good Morning” message along with your current weather conditions.


Hopefully, Apple will implement a “persistent” version of this amazing widget in the first public build of iOS 12 firmware.


Sponsor Ads:
Gihosoft iPhone Data Recovery is a professional iPhone Data Recovery software to get back all your lost text message, photo, video, call history, note, contact and more from iPhone/iPad/iPod Touch. It offers a full solution to recover your lost data in different tough situations. Besides recovering data directly from iPhone, iPad and iPod touch, it also allows you to recover data from iCloud and iTunes backup files. What's more, it supports Smart Recovery modes that can find your iPhone data quickly.https://www.gihosoft.com/iphone-data-recovery-free.html


How to Fix iPhone Recent Calls not Showing Up


How to Fix iPhone Recent Calls not Showing Up


If you notice that your recent calls are not showing on iPhone, here are the possible solutions.
A) Check storage, network, and time zone:
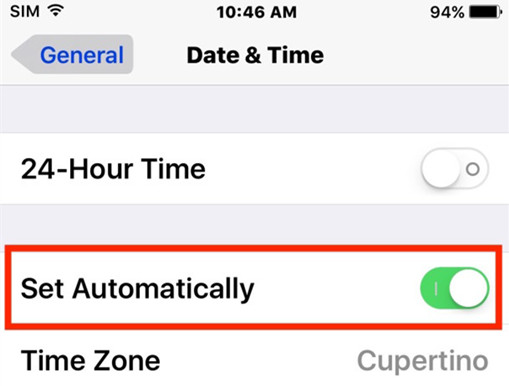
i. Let your date and time update automatically:


Make sure you have the latest version of iOS


Navigate to settings > General > Date and Time


Click on the time-zone and set it to the one that corresponds to your current location.


ii. Fix network issues:


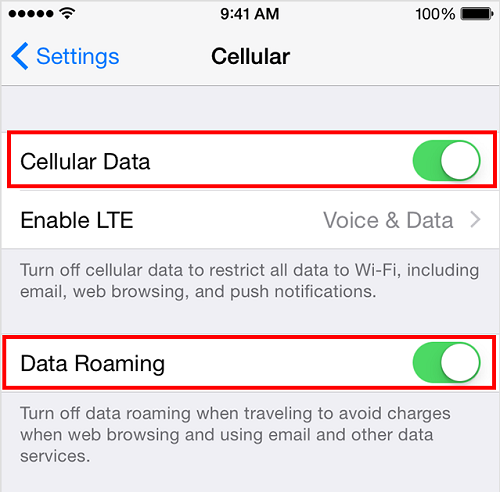
Make sure your cellular data is on by navigating to settings > cellular data


If you are traveling, switch on your data roaming at Settings > Cellular > Cellular Data Options > Data Roaming.


iii. Fix memory issue:


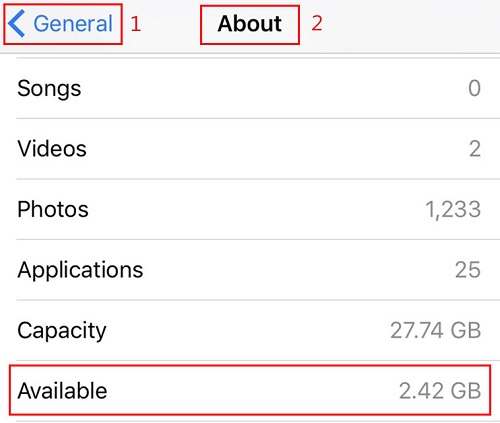
Navigate to Settings > General > About


Scroll down till you see the “available” option


Normally, the larger the available space, the better the condition of your iPhone.


B) Restart/Reset Your iPhone:


Another step to take when your iPhone 6 recent calls not logging is to restart your iPhone. If this doesn’t work, then you may need to reset your iPhone to default settings.
C) Backup from iCloud:


You also consider recovering your data from iCloud/iTunes. This will enable you to restore the data you have lost.


Go to Settings > General > Reset, then tap “Erase all content and settings.”


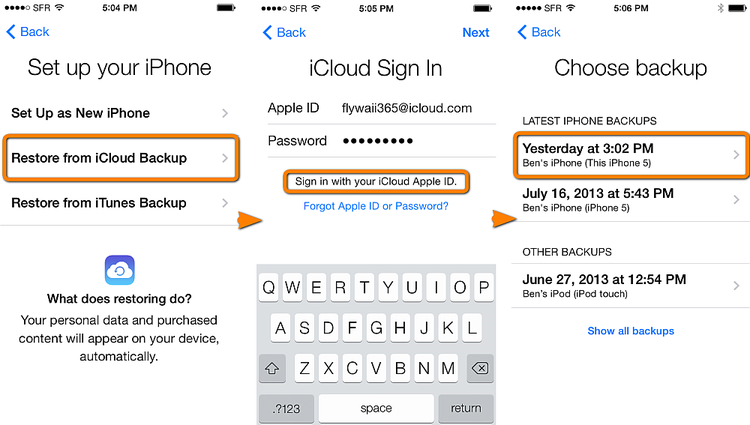
On the Apps & Data screen, tap Restore from iCloud Backup, then sign in to iCloud.


Proceed to “Choose backup,” then choose from a list of available backups in iCloud.


Do you like this story?


Sponsor Ads:
Gihosoft iPhone Data Recovery is a professional iPhone Data Recovery software to get back all your lost text message, photo, video, call history, note, contact and more from iPhone/iPad/iPod Touch. It offers a full solution to recover your lost data in different tough situations. Besides recovering data directly from iPhone, iPad and iPod touch, it also allows you to recover data from iCloud and iTunes backup files.

Tuesday, August 1, 2017

How to Install iOS 11 beta 4 profile without a developer account

How to Install iOS 11 beta 4 profile without a developer account

Step 1: Open Safari Browser on your iPhone or iPad and Go to this link 

Step 2: You will see a file in Google Drive that you need to download. So simply Tap Download Button
Having some issues while installing iOS 11 beta 4 on your iPhone? Or want to install iOS 11 beta 4 without a developer account? Step 1: Open Safari Browser on your iPhone or iPad and Go to this link
Step 3: It will then redirect to iOS Beta Software Profile screen where you can install iOS 11 beta 4 profile easily. For that Tap Install
Having some issues while installing iOS 11 beta 4 on your iPhone? Or want to install iOS 11 beta 4 without a developer account? Step 1: Open Safari Browser on your iPhone or iPad and Go to this link
Step 4: Enter Passcode if you have any
Having some issues while installing iOS 11 beta 4 on your iPhone? Or want to install iOS 11 beta 4 without a developer account? Step 1: Open Safari Browser on your iPhone or iPad and Go to this link
Step 5: It will then show a message from Apple and on the very right hand side on top of your screen, you will see an Install button. Simply tap it.
Having some issues while installing iOS 11 beta 4 on your iPhone? Or want to install iOS 11 beta 4 without a developer account? Step 1: Open Safari Browser on your iPhone or iPad and Go to this link
Step 6: It will again Pop Up a Install and Cancel button for the last time. Hit Install again
Having some issues while installing iOS 11 beta 4 on your iPhone? Or want to install iOS 11 beta 4 without a developer account? Step 1: Open Safari Browser on your iPhone or iPad and Go to this link
Step 7: Tap Restart


Having some issues while installing iOS 11 beta 4 on your iPhone? Or want to install iOS 11 beta 4 without a developer account? Step 1: Open Safari Browser on your iPhone or iPad and Go to this link
Step 8: After your iPhone or iPad restarts, iOS 11 beta 4 is ready to be installed on your device. For that, Go to Settings app – General – Software Update

Having some issues while installing iOS 11 beta 4 on your iPhone? Or want to install iOS 11 beta 4 without a developer account? Step 1: Open Safari Browser on your iPhone or iPad and Go to this link
Step 9: Tap on Download and Install Button and sit relaxed. It will automatically download iOS 11 beta on your device and install it for you. The file size of iOS 11 beta 4 is huge so it may take some time to be downloaded depending on your internet speed. 

So this is all guys! Hope you find it useful and don’t forget to share it with your friends too.

You may also like:
If you lost videos from iOS Camerall Roll which are nowhere to download again, you can use Gihosoft iPhone Data Recovery to get back deleted videos from iOS device including iPhone, iPad and iPod Touch.Please check jihosoft iphone data recovery

RAW Photo-Editing Software Keeps Your Photos High-Quality [Deals Hub]

Today’s technology is letting us capture moments in higher quality than ever before. But unfortunately, the photo editing software isn’t alw...